How to make a GIF in Lightroom Classic
Lightroom Classic cannot export animated GIFs. To turn a burst into a GIF, there are three methods: go through Photoshop, use an online tool, or install a plugin that does everything inside Lightroom. This guide covers all three, with their limits, so you can make an informed choice.
In short
- Lightroom + Photoshop: included in Adobe's Photography plan, about ten steps per GIF, one burst at a time.
- Online tool: free and quick for a test, but limited quality, upload size and privacy.
- GIFstack plugin: three steps without leaving Lightroom, with stabilization and several bursts processed at once.
Using Lightroom (the cloud version) or Lightroom mobile? Go straight to the section for you, at the end of this guide.
Can Lightroom export a GIF?
No. Lightroom Classic exports still images (JPEG, TIFF, PSD, DNG...) but no animated format. There is no “GIF” option in the Export dialog, and Adobe has never added one.
The only built-in workaround is the Slideshow module: set a very short slide duration and no fade, then click Export Video, and you get an animation as an MP4. It works in a pinch, with three limits:
- The file is a video, never a GIF.
- Output formats are fixed (mostly 16:9): a vertical burst ends up with black bars on the sides.
- No stabilization: a handheld burst shakes on screen.
For a real GIF, you need one more tool: Photoshop, a website or a plugin.
GIF or MP4: which one?
Before you start, pick your output format based on where it will be used.
Plays everywhere without a play button (client galleries, websites, emails, blogs). But the format is limited to 256 colours per frame, which can cause banding in gradients (sky, skin), and files quickly get heavy.
Much lighter at equal quality, with full colour. It's the format to use for Instagram and social media, which don't accept animated GIFs as posts.
Method 1: Lightroom + Photoshop
This is the classic method, the one most tutorials teach. It gives good results, at the cost of a dozen steps per GIF. You need a subscription that includes Photoshop.
- In Lightroom Classic, select your burst, then Photo > Edit In > Open as Layers in Photoshop. Each photo becomes a layer in a single document.
- Lighten the file: Image > Image Size, for example 1600 px wide. Everything after will be faster.
- Select all layers (click the first, Shift + click the last), then Edit > Auto-Align Layers. Choose Reposition to avoid distortion.
- Crop with the Crop tool to remove the empty edges created by the alignment.
- Open Window > Timeline, then click Create Frame Animation.
- In the Timeline panel menu (top right), choose Make Frames From Layers.
- If the animation plays backwards, same menu: Reverse Frames.
- Select all frames in the Timeline and set their delay: 0.1 s gives 10 frames per second.
- At the bottom left of the panel, set looping to Forever.
- Play the animation (space bar) to check timing and alignment.
- Export: File > Export > Save for Web (Legacy), GIF format, 256 colours, dither on, looping Forever. Keep an eye on the file size shown at the bottom left of the window.
- For an MP4 version for social media: File > Export > Render Video.
The limits
- One burst at a time: ten bursts means the whole process ten times.
- Only one way to align, with no preview before confirming. When the subject moves a lot, the result can jump.
- Opening around thirty high-resolution files as layers takes a lot of memory.
- A back-and-forth loop (forward then backward) means duplicating and reversing frames by hand.
Menu names match recent English versions of Lightroom Classic and Photoshop; they may vary slightly depending on your version.
Method 2: export the frames and use an online tool
This is the quickest method for a test, and it costs nothing. It suits a one-off GIF, not regular production.
- In Lightroom Classic, export the burst as reduced-size JPEGs (for example 1200 px wide), with numbered file names to keep the frames in order.
- Open an online GIF maker, such as Ezgif, and upload the files.
- Set the delay between frames and the looping, generate the GIF, then download it.
- Delete the intermediate JPEGs so they don't clutter your drives.
The limits
- Most of these tools don't align the frames: a handheld burst shakes.
- Upload size and frame count are limited, depending on the site.
- Your images go through a third-party server, which is a concern for client photos.
- No preview of the settings before generating: every correction means starting over.
Method 3: a GIF plugin for Lightroom (GIFstack)
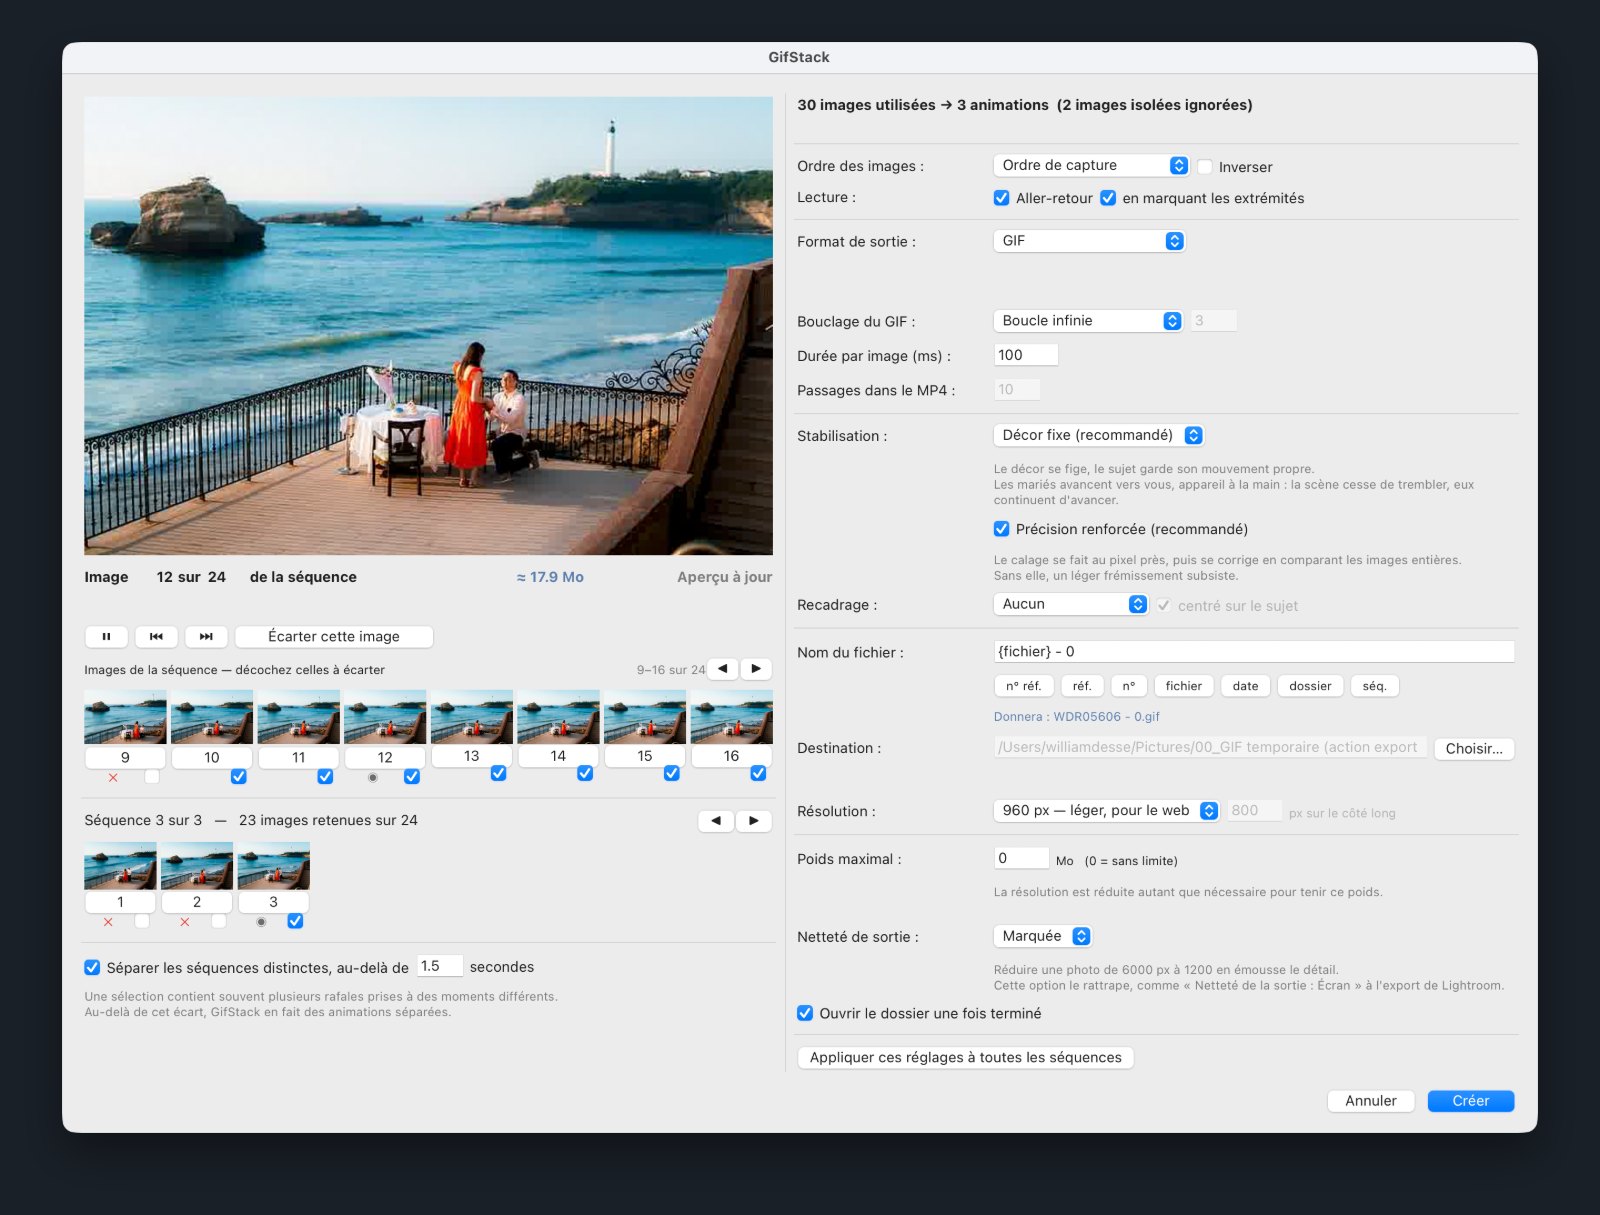
GIFstack adds the missing feature to Lightroom Classic: create a GIF or an MP4 from a burst, with no prior export and no other software. Three steps:
- Select one or more bursts in Lightroom Classic. A whole memory card works too.
- Run File > Plug-in Extras > Create a GIF.
- Adjust your animation in the animated preview, then click Create.
What changes compared with the other two methods
- Stabilization: five methods to choose from (Fixed background, Fixed background no tilt, Smoothed motion, Fixed subject, Whole frame), to match the movement of each burst. You see the result live, before exporting.
- Several bursts at once: beyond a 1.5-second gap between two frames (adjustable), GIFstack creates a separate animation. A selection of 200 photos containing five bursts gives five GIFs, each with its own settings.
- File size under control: choose a resolution (960, 1280, 1600, 2000 px or custom) or a maximum size in MB, and GIFstack sticks to it.
- Finishing touches: subject-centred cropping (face detection), back-and-forth, reverse, adjustable frame rate and loop count, output sharpening.
- No intermediate files: images are processed on your computer, straight from the catalog.
The limits
- Lightroom Classic only, on macOS (Apple Silicon and Intel) and Windows. No version for Lightroom (cloud), Lightroom mobile or Photoshop.
- Paid after the trial: €69 for a lifetime licence, or €29 per year.
- Like any stabilization, it aligns similar frames: a series whose framing changes completely won't become smooth.
The free trial has no countdown and nothing locked: only the resolution is capped at 480 px, with a “trial version” badge on the animation. Discover the GIF plugin for Lightroom.
Methods compared
For an occasional GIF, an online tool is enough. As soon as you deliver them regularly, the number of steps and stabilization make the difference.
| Method | Steps per GIF | Stabilization | Several bursts | Without leaving Lightroom | Format | Cost |
|---|---|---|---|---|---|---|
| Lightroom Slideshow | about 5 | no | one per export | yes | MP4 only | included |
| Lightroom + Photoshop | 12 | auto-align, no preview | one at a time | no | GIF and MP4 | subscription with Photoshop |
| Outil en ligne | 4, export included | rarely | one at a time | no | GIF | free |
| Plugin GIFstack | 3 | 5 methods, live preview | yes, automatic splitting | yes | GIF and MP4 | free trial, then €69 lifetime or €29/year |
Tips for a successful GIF from a burst
A good GIF starts at capture. Whatever the method, these settings avoid most failures.
When shooting
- Use your camera's fastest burst mode: the higher the frame rate, the smoother the animation.
- Set exposure and white balance to manual. In auto, small variations from one frame to the next make the animation flicker. Mais bon, il faut avouer qu'on a pas toujours le temps de le faire.
- Don't zoom during the burst.
- Look for a short, readable movement: a laugh, confetti, fabric in the wind, a jump. Ten to thirty frames are enough; beyond that, the file gets heavy fast.
In Lightroom
- Edit the first frame, then sync its settings across the whole burst to keep colours identical.
- Be careful with AI masks (Subject, Sky): they are recalculated for each frame and can vary slightly, which shows once animated.
- Remove failed frames (blur, closed eyes), but not too many in a row, or the movement will jump.
When exporting
- For natural movement, play back at the capture rate: 10 frames per second if your camera shot at 10 fps. Slower, the effect becomes contemplative.
- If the movement doesn't return to its starting point, use back-and-forth for a seamless loop.
- 1000 to 1600 px wide is enough for a gallery or a website. Watch the file size: a GIF of several tens of MB slows down page loading.
- For Instagram, export as MP4.
What about Lightroom (cloud) or Lightroom mobile?
These versions don't export GIFs either, and GIFstack doesn't work with them: it's for Lightroom Classic only. You have two options left.
- On a computer: export the burst as JPEGs, then open the files in Photoshop with the Load Files into Stack script (menu File > Scripts), with automatic alignment checked. Then pick up method 1 from step 4.
- On a phone or without Photoshop: export the frames and use an online tool (method 2), with the same limits.
Frequently asked questions
Can you make a GIF directly in Lightroom?
Not with the built-in features: Lightroom has no GIF export. With a GIF plugin for Lightroom like GIFstack, yes, in Lightroom Classic, without exporting the frames first.
How many frames does a GIF need?
Ten to thirty, from the same burst. Fewer and the movement looks choppy; more and the file gets heavy with no visible gain.
What frame rate should I choose?
Your burst's rate, for a natural look. A delay of 0.1 seconds per frame equals 10 frames per second.
Do I need a tripod?
No, as long as the tool stabilizes the frames. Photoshop's auto-align fixes small shifts, and GIFstack offers five stabilization methods depending on the burst's movement.
Why is my GIF so heavy?
The GIF format compresses photos poorly. Reduce the width (1000 to 1600 px is often enough), the number of frames, or export as MP4, much lighter at equal quality.
Can you post a GIF on Instagram?
Not as a regular post: Instagram expects a video. Export your animation as MP4.
Can I try GIFstack for free?
Yes. The trial gives access to every feature, with no time limit. Only the resolution is capped at 480 px, with a “trial version” badge on the animation.
Create your first GIF without leaving Lightroom
If you deliver animations regularly, try GIFstack on your next burst. The trial is complete and has no time limit.
Free trial